What does it mean to white label Vapi?
White labeling Vapi means selling voice AI and chat services through your agency's brand while Vapi remains part of the underlying technology. VoiceAIWrapper provides the client-facing and operational layer around that infrastructure.
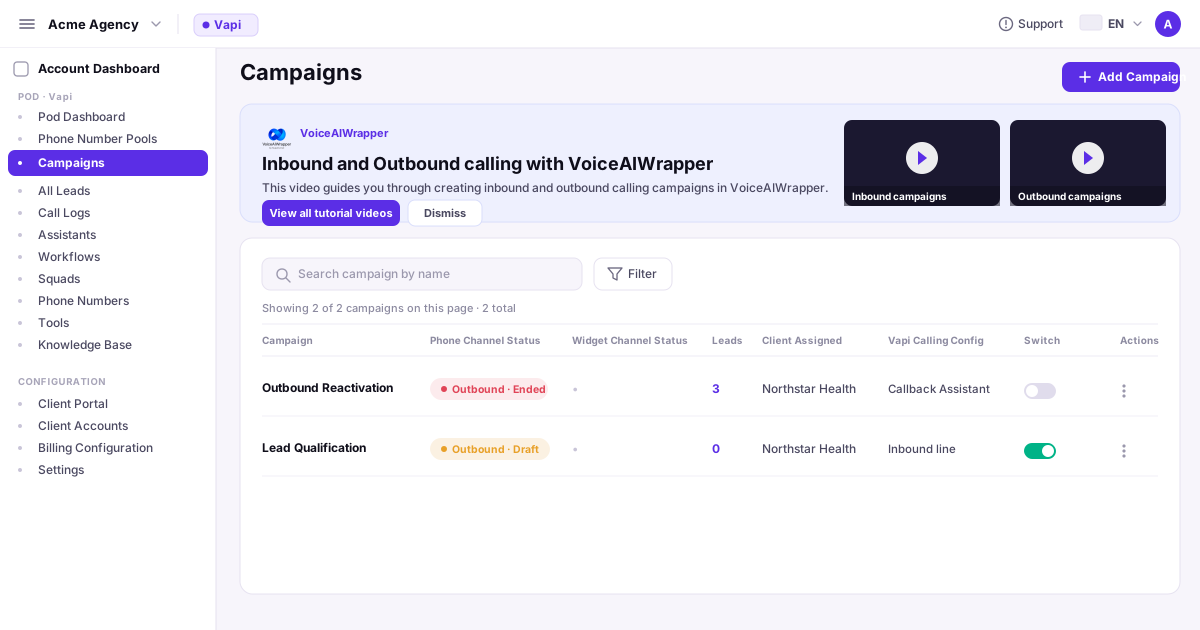
Vapi's official provider documentation lists VoiceAIWrapper as a platform for agencies that want to brand the client experience, set pricing, onboard clients, and run campaigns on top of Vapi.
For an agency, this changes the operating model in five practical ways:
Clients sign in through an agency-branded portal.
The agency can create or sync agents and assign them to client workspaces.
The agency controls what each client can view or edit.
The agency can charge clients for usage and services.
The client does not need to manage the provider stack directly.
What rebilling clients means: Your agency sells AI voice or chat services under its own brand and sets the client-facing price. VoiceAIWrapper records usage and supports recurring plans, prepaid usage packs, one-time charges, and client plan assignment through its billing workflow. Stripe can collect payment inside the platform. External billing keeps collection outside it, while API-based billing can connect another billing system on an eligible plan. Margin is the client revenue left after Vapi usage, the VoiceAIWrapper subscription, payment processing, taxes, support, refunds, and other delivery costs. Rebilling creates a commercial model, but it does not guarantee profit.
Quick questions before you start
Does VoiceAIWrapper replace Vapi? No. Vapi remains the provider that runs the connected voice agents. VoiceAIWrapper adds agent creation, agency branding, client management, billing controls, campaigns, widgets, and reporting around the provider.
Will clients see Vapi or VoiceAIWrapper? A correctly configured white-label portal uses your agency's domain, logo, colors, pages, and support settings. Test the portal as a client before launch to catch any default labels or links you have not replaced.
Can I charge more than the underlying usage cost? Yes. You set the client-facing rate or plan. Profit is not automatic, so include provider usage, software, payment fees, support, taxes, and failed-payment risk when you set the price.
Before you connect Vapi
Have these items ready:
An active Vapi organization and the credentials requested by the VoiceAIWrapper connection form.
The correct Vapi region. If the organization uses the European endpoint, you must select the matching EU option.
Your Vapi concurrency allowance and the inbound versus outbound allocation you plan to use.
Your agency logo, brand colors, preferred client-portal subdomain, and access to your DNS settings.
A Stripe account if you want VoiceAIWrapper to collect client payments through Stripe.
A client, workspace, agent, and test phone number that you can use without affecting live traffic.
Do not start with a production client. Use an internal test workspace first. That gives you a safe place to confirm permissions, billing, call records, and branding.
How Vapi and VoiceAIWrapper divide the work
How Vapi, VoiceAIWrapper, and the agency divide setup responsibilities
Layer | Main responsibility |
|---|---|
Vapi | Voice-agent orchestration, Vapi-side assets, phone-number configuration, event handling, and concurrency |
VoiceAIWrapper | Guided agent creation, provider asset sync, client accounts, workspaces, permissions, branded portals, billing plans, campaigns, widgets, and client-facing reporting |
Your agency | Offer design, pricing, sales, implementation decisions, quality checks, support, and client outcomes |
VoiceAIWrapper calls each connected provider organization a VoiceAI Pod. One Pod represents one provider organization. Agencies that manage more than one Vapi organization can add more than one Pod and assign the appropriate Pod to each client workspace.

Video: Vapi White Label Platform for Agencies: 7-Minute Tour
This 6-minute 41-second product tour shows how an agency connects Vapi to VoiceAIWrapper, imports Vapi agents and related assets, and delivers them through an agency-branded client portal. It also covers custom domains, client access, multilingual portals, Stripe billing, usage markups, inbound and outbound campaigns, call records, analytics, and website widgets. Vapi continues to run the underlying voice agents while VoiceAIWrapper provides the agency-facing management and commercial layer.
Step 1: Add a VoiceAI Pod and choose Vapi
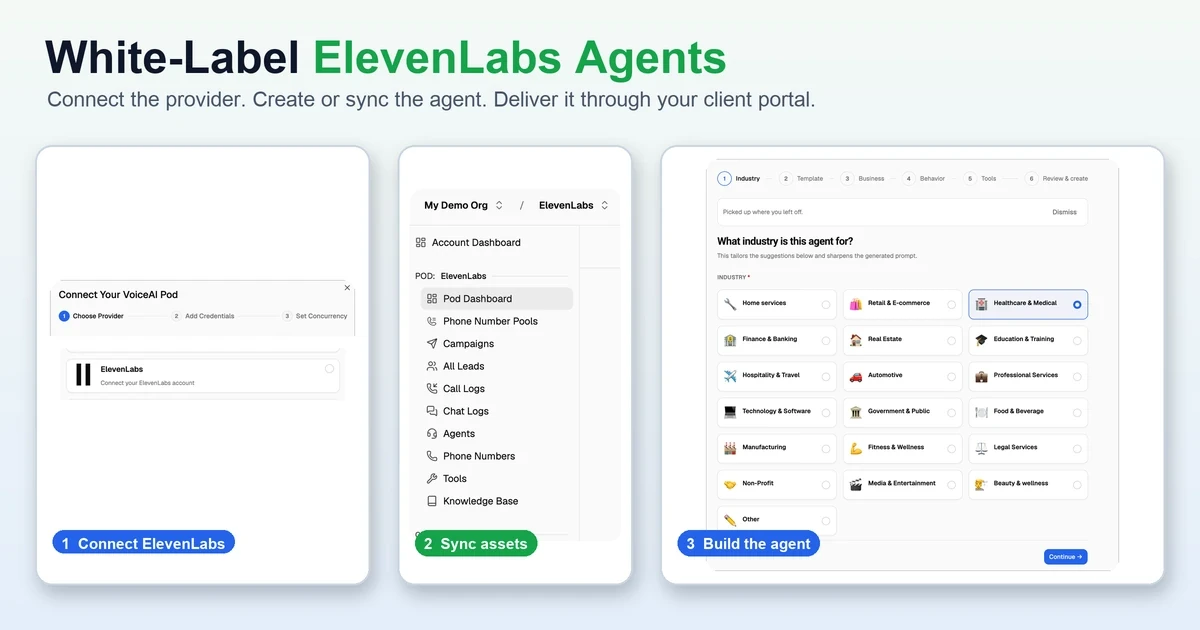
Sign in to VoiceAIWrapper and start the Connect Your VoiceAI Pod flow. Choose Vapi as the provider, then continue to the credentials stage.
Use a clear internal name for each VoiceAI Pod.
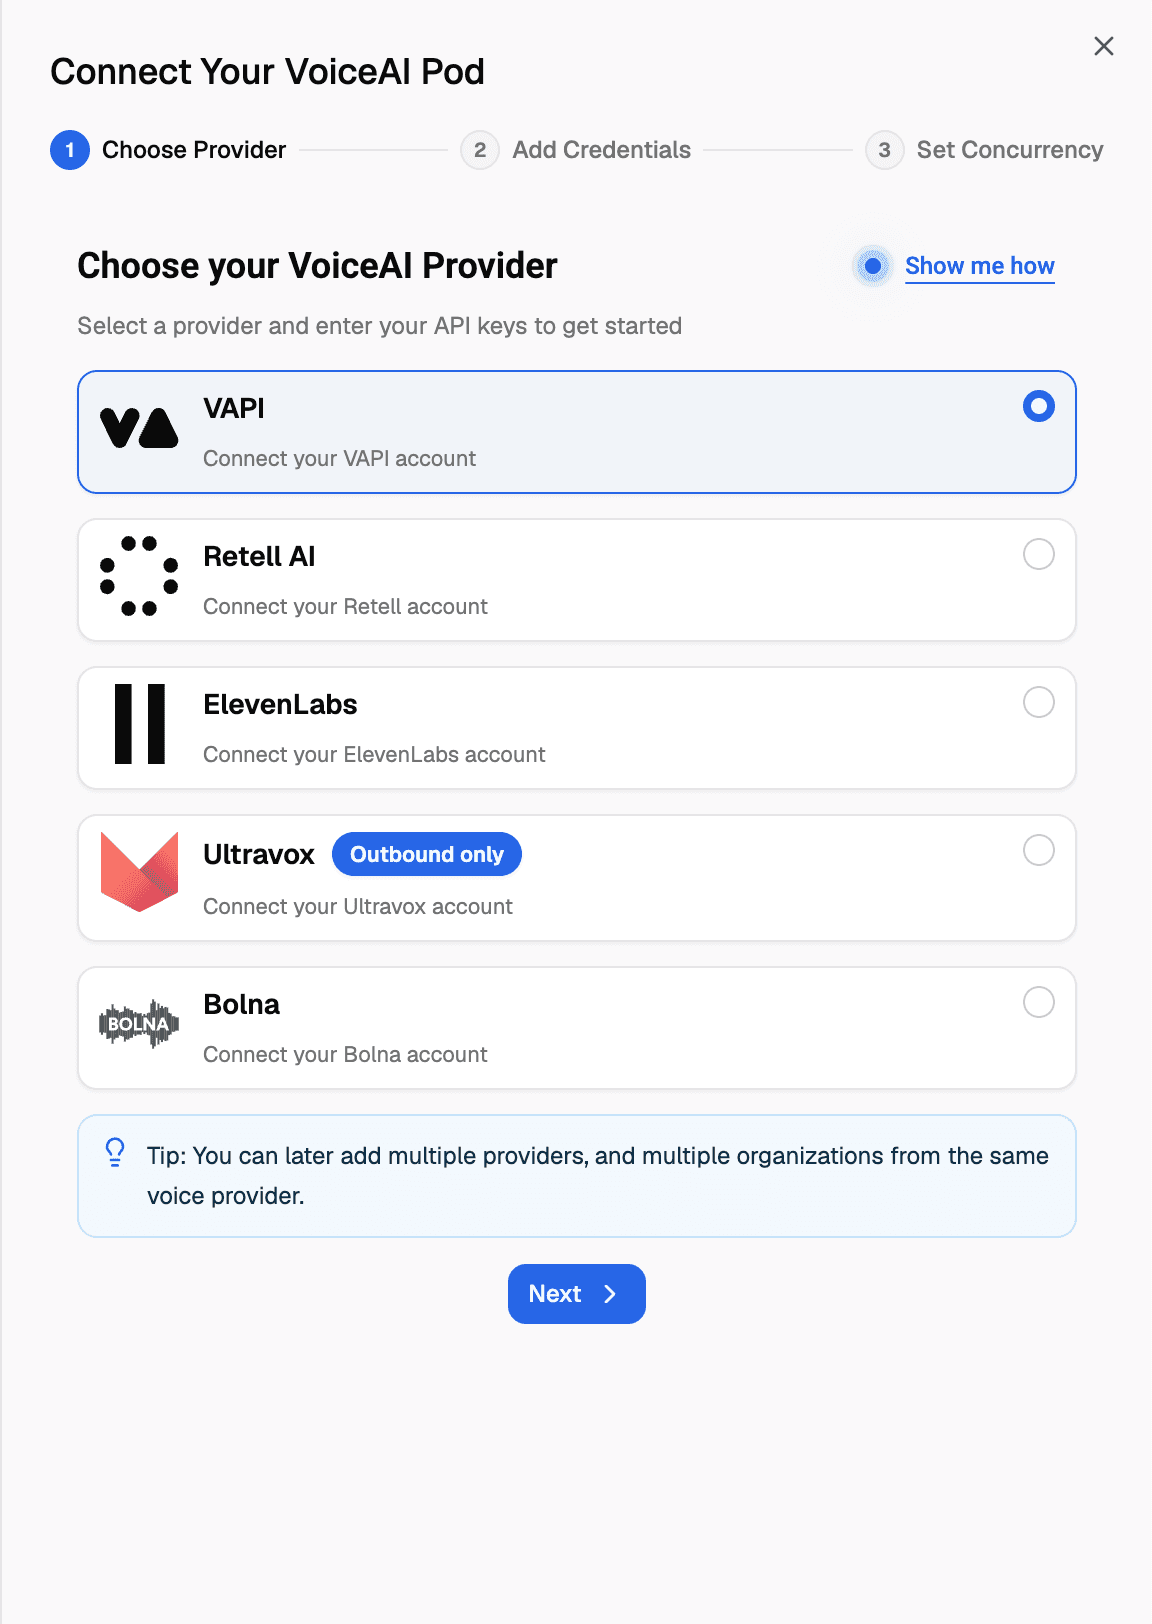
Labels such as Agency Vapi EU or Client Group A are more useful than Main when your agency adds more provider organizations later.
Official setup reference: Connect and configure Voice AI Pods.
Step 2: Enter the Vapi credentials and region
Open API Keys in Vapi, add a dedicated key for this connection, give it a name your team will recognize, and store the new token securely. Vapi describes private keys as server-side credentials, so do not place one in browser code or another client-facing surface.
Enter the Vapi API key and matching organization ID in the VoiceAIWrapper connection form. Do not paste a key from a different Vapi organization. Vapi's current VoiceAIWrapper provider page identifies these two values in its connection step.
Choose the EU domain option only when the Vapi organization uses the European endpoint. A region mismatch can make valid credentials appear broken or prevent assets from loading.
Security rule: treat provider keys as credentials, not content. Store them in an approved password or secrets manager. Do not place them in screenshots, tickets, chat messages, or client documentation. Review the VoiceAIWrapper security policy before you define your agency's credential-handling process.
Vapi reference: API keys.
Step 3: Match and allocate concurrency
Enter the concurrency available to the connected Vapi organization. The total in VoiceAIWrapper should match the provider allowance. Then allocate it between inbound and outbound activity.
For example, a team that mainly receives calls should reserve more capacity for inbound traffic. A team that runs scheduled outbound campaigns should reserve enough outbound capacity to complete those calls without consuming the full inbound allowance.
Two checks matter here:
Do not enter more concurrency than the provider organization actually has.
Do not allocate the entire allowance to outbound calls if the client also expects inbound calls.
Finish the Pod setup only after the total and allocation match the intended use.
Step 4: Confirm that Vapi assets appear in VoiceAIWrapper
After the connection completes, open the account dashboard and confirm that the Pod is connected. Check the relevant asset areas, including assistants, workflows, squads, phone numbers, tools, and knowledge bases.
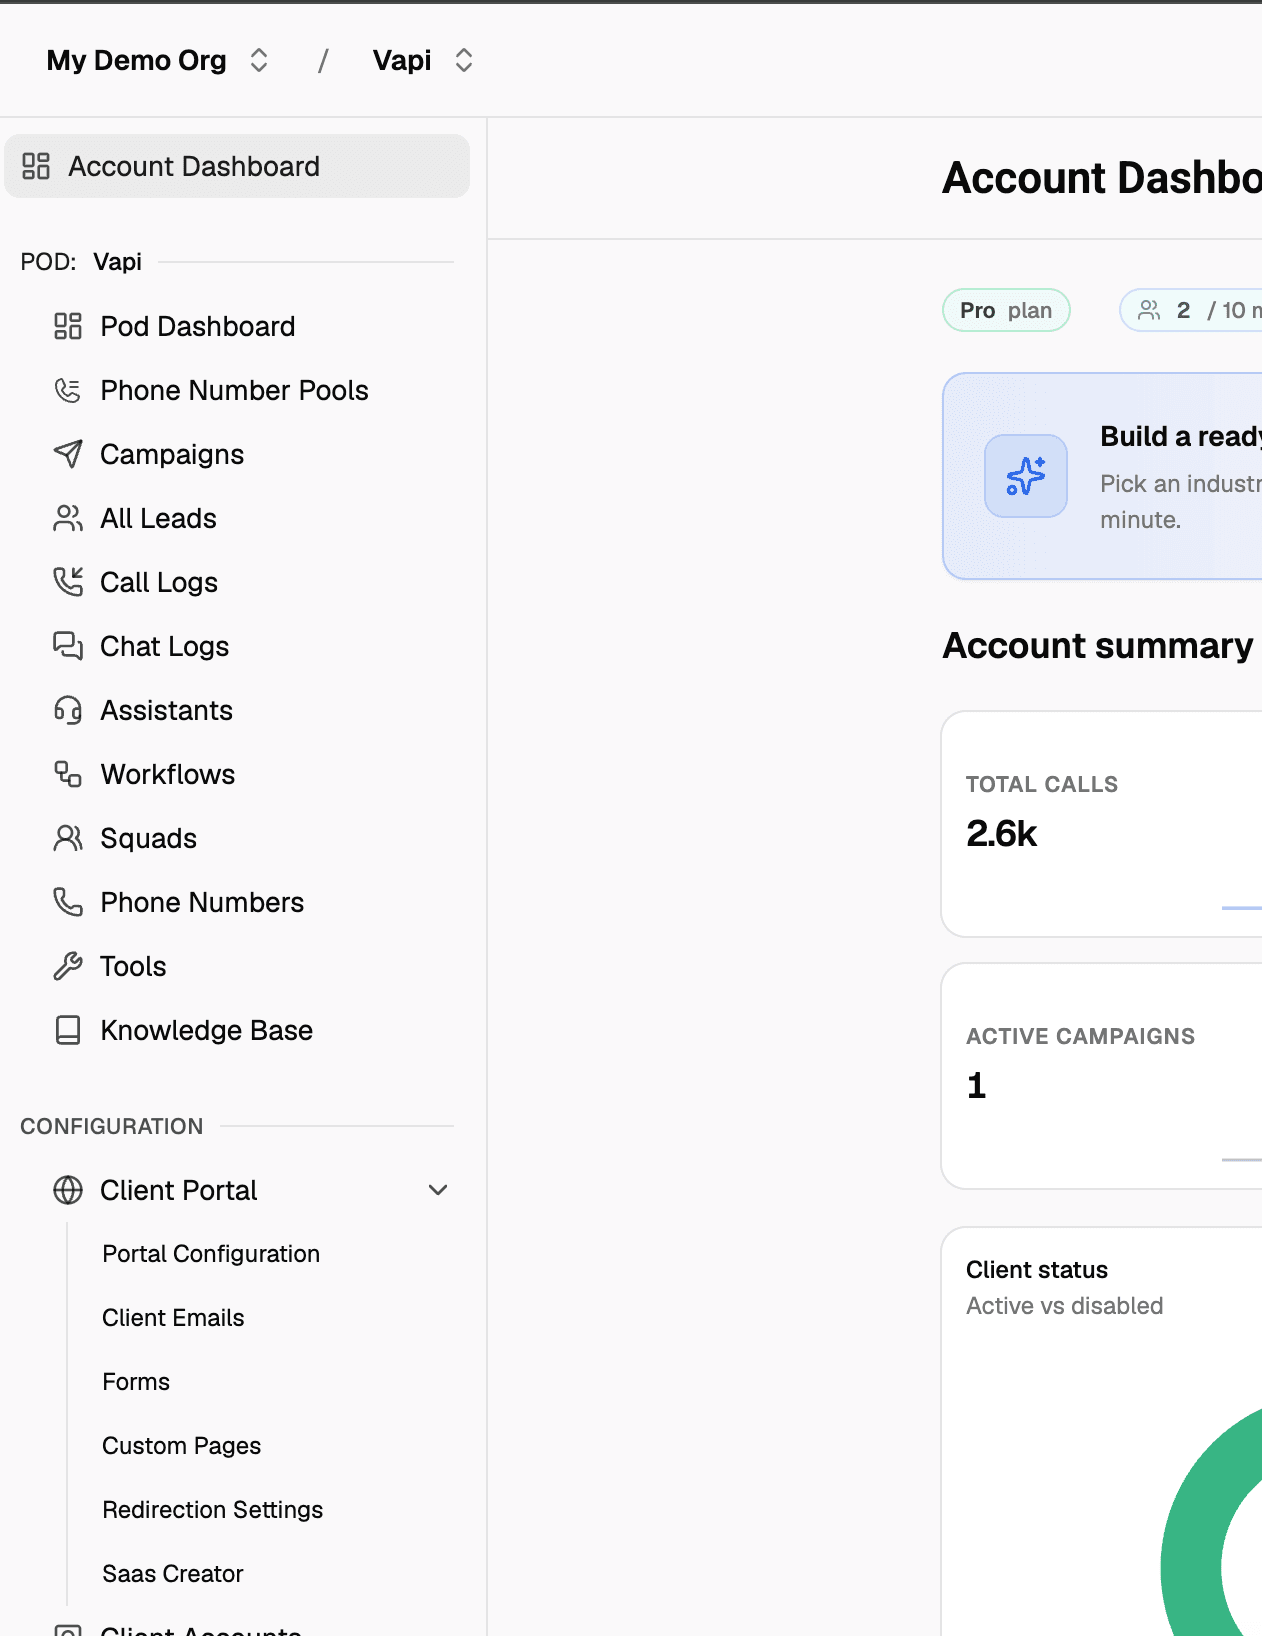
The current product flow makes connected Vapi assets available in VoiceAIWrapper. Use Sync or Sync now on the required agent or phone number if the interface prompts you. VoiceAIWrapper supports agent work across the connected systems, so establish one operating rule for your team: decide where each type of change should normally be made, then verify the result in both interfaces before publishing it to a client.
If assets do not appear, check the organization, key, region, and Pod status before recreating anything. Duplicate agents and phone numbers make later client assignment harder to audit.
Step 5: Create or prepare the agent
You can work with an existing Vapi agent or use the VoiceAIWrapper Agent Builder. The current builder guides the setup through six stages:
Industry
Template
Business
Behavior
Tools
Review and create
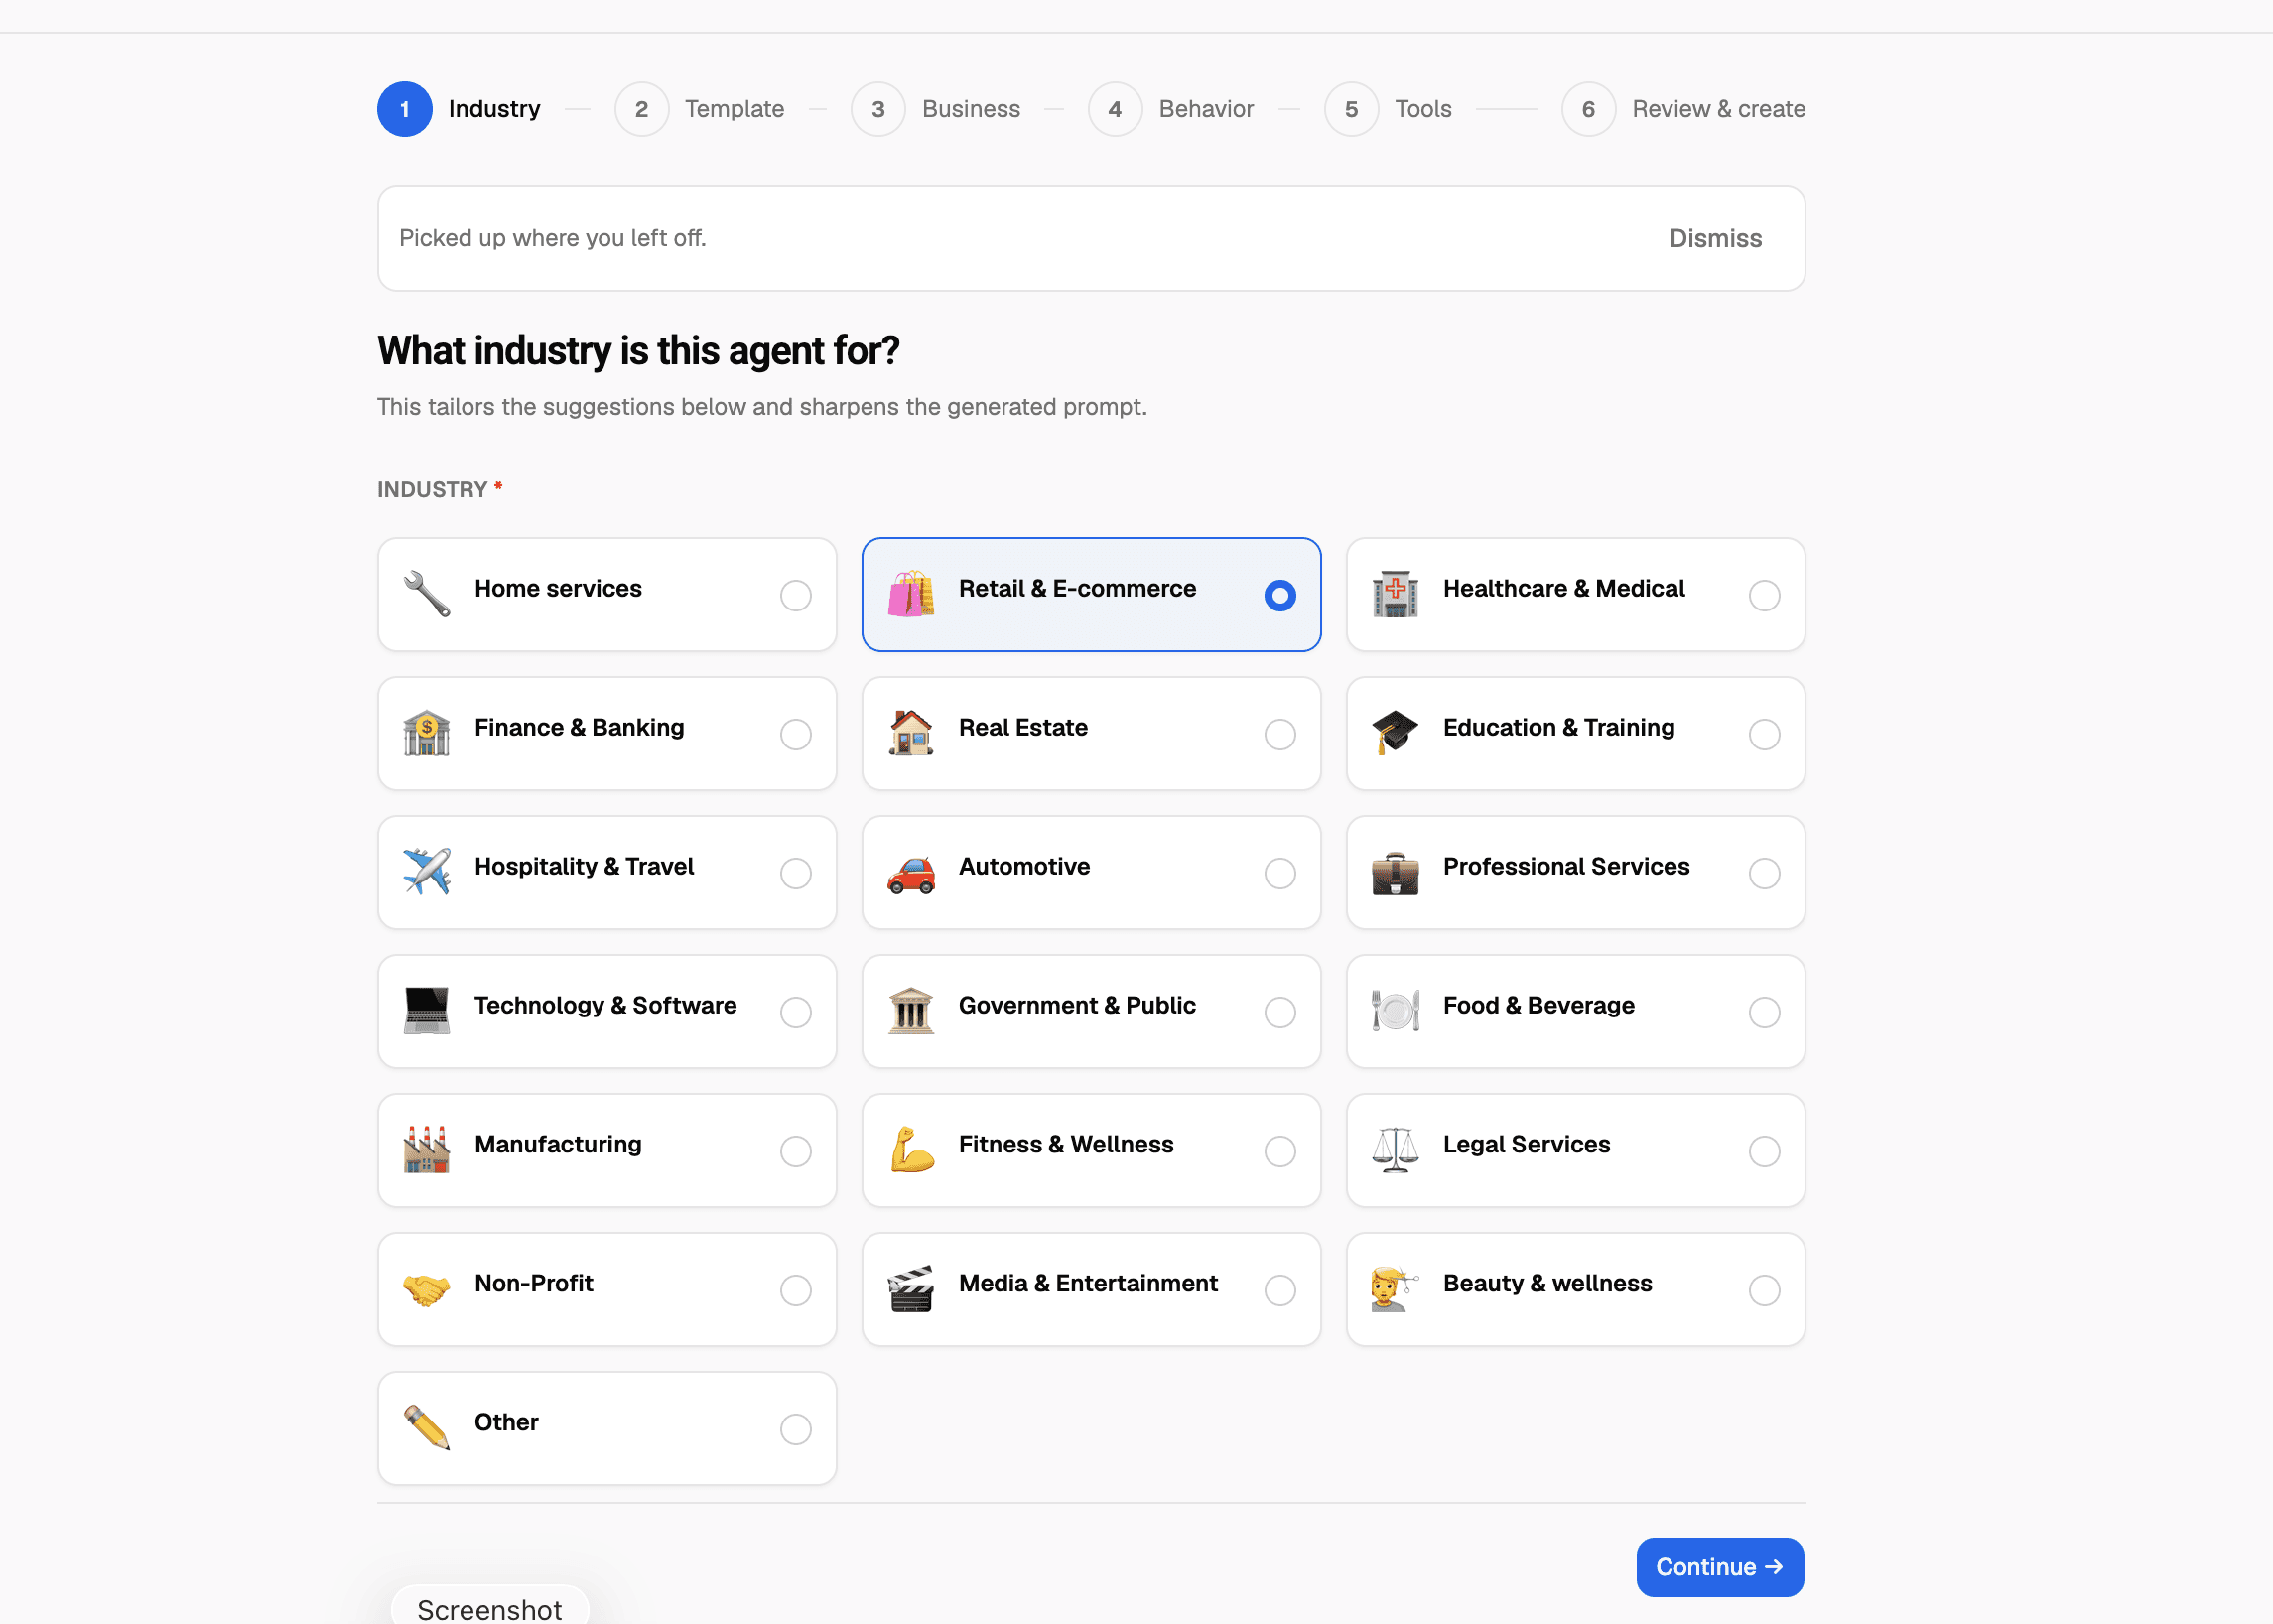
The guided builder reduces repetitive setup, but it does not remove the need for testing. Check the prompt, first message, model, voice, tools, knowledge sources, transfer behavior, voicemail behavior, and failure handling before assigning the agent to a client.
Run at least these tests:
A normal request the agent should complete.
A request that requires a tool or knowledge lookup.
A request outside the agent's scope.
A transfer or escalation case.
Silence, interruption, and a caller speaking over the agent.
A failed tool call or unavailable destination.
For performance work after the connection is stable, use the Vapi voice AI optimization guide. Keep optimization separate from this initial setup so you can isolate configuration errors.
Step 6: Configure the white-label client portal
Open the client-portal settings and configure the client-facing experience:
Add the agency logo and brand colors.
Choose the portal subdomain.
Add the required DNS record and verify it.
Select the languages needed by your client base.
Configure navigation and custom pages.
Set the support widget and contact route.
Preview desktop and mobile layouts.
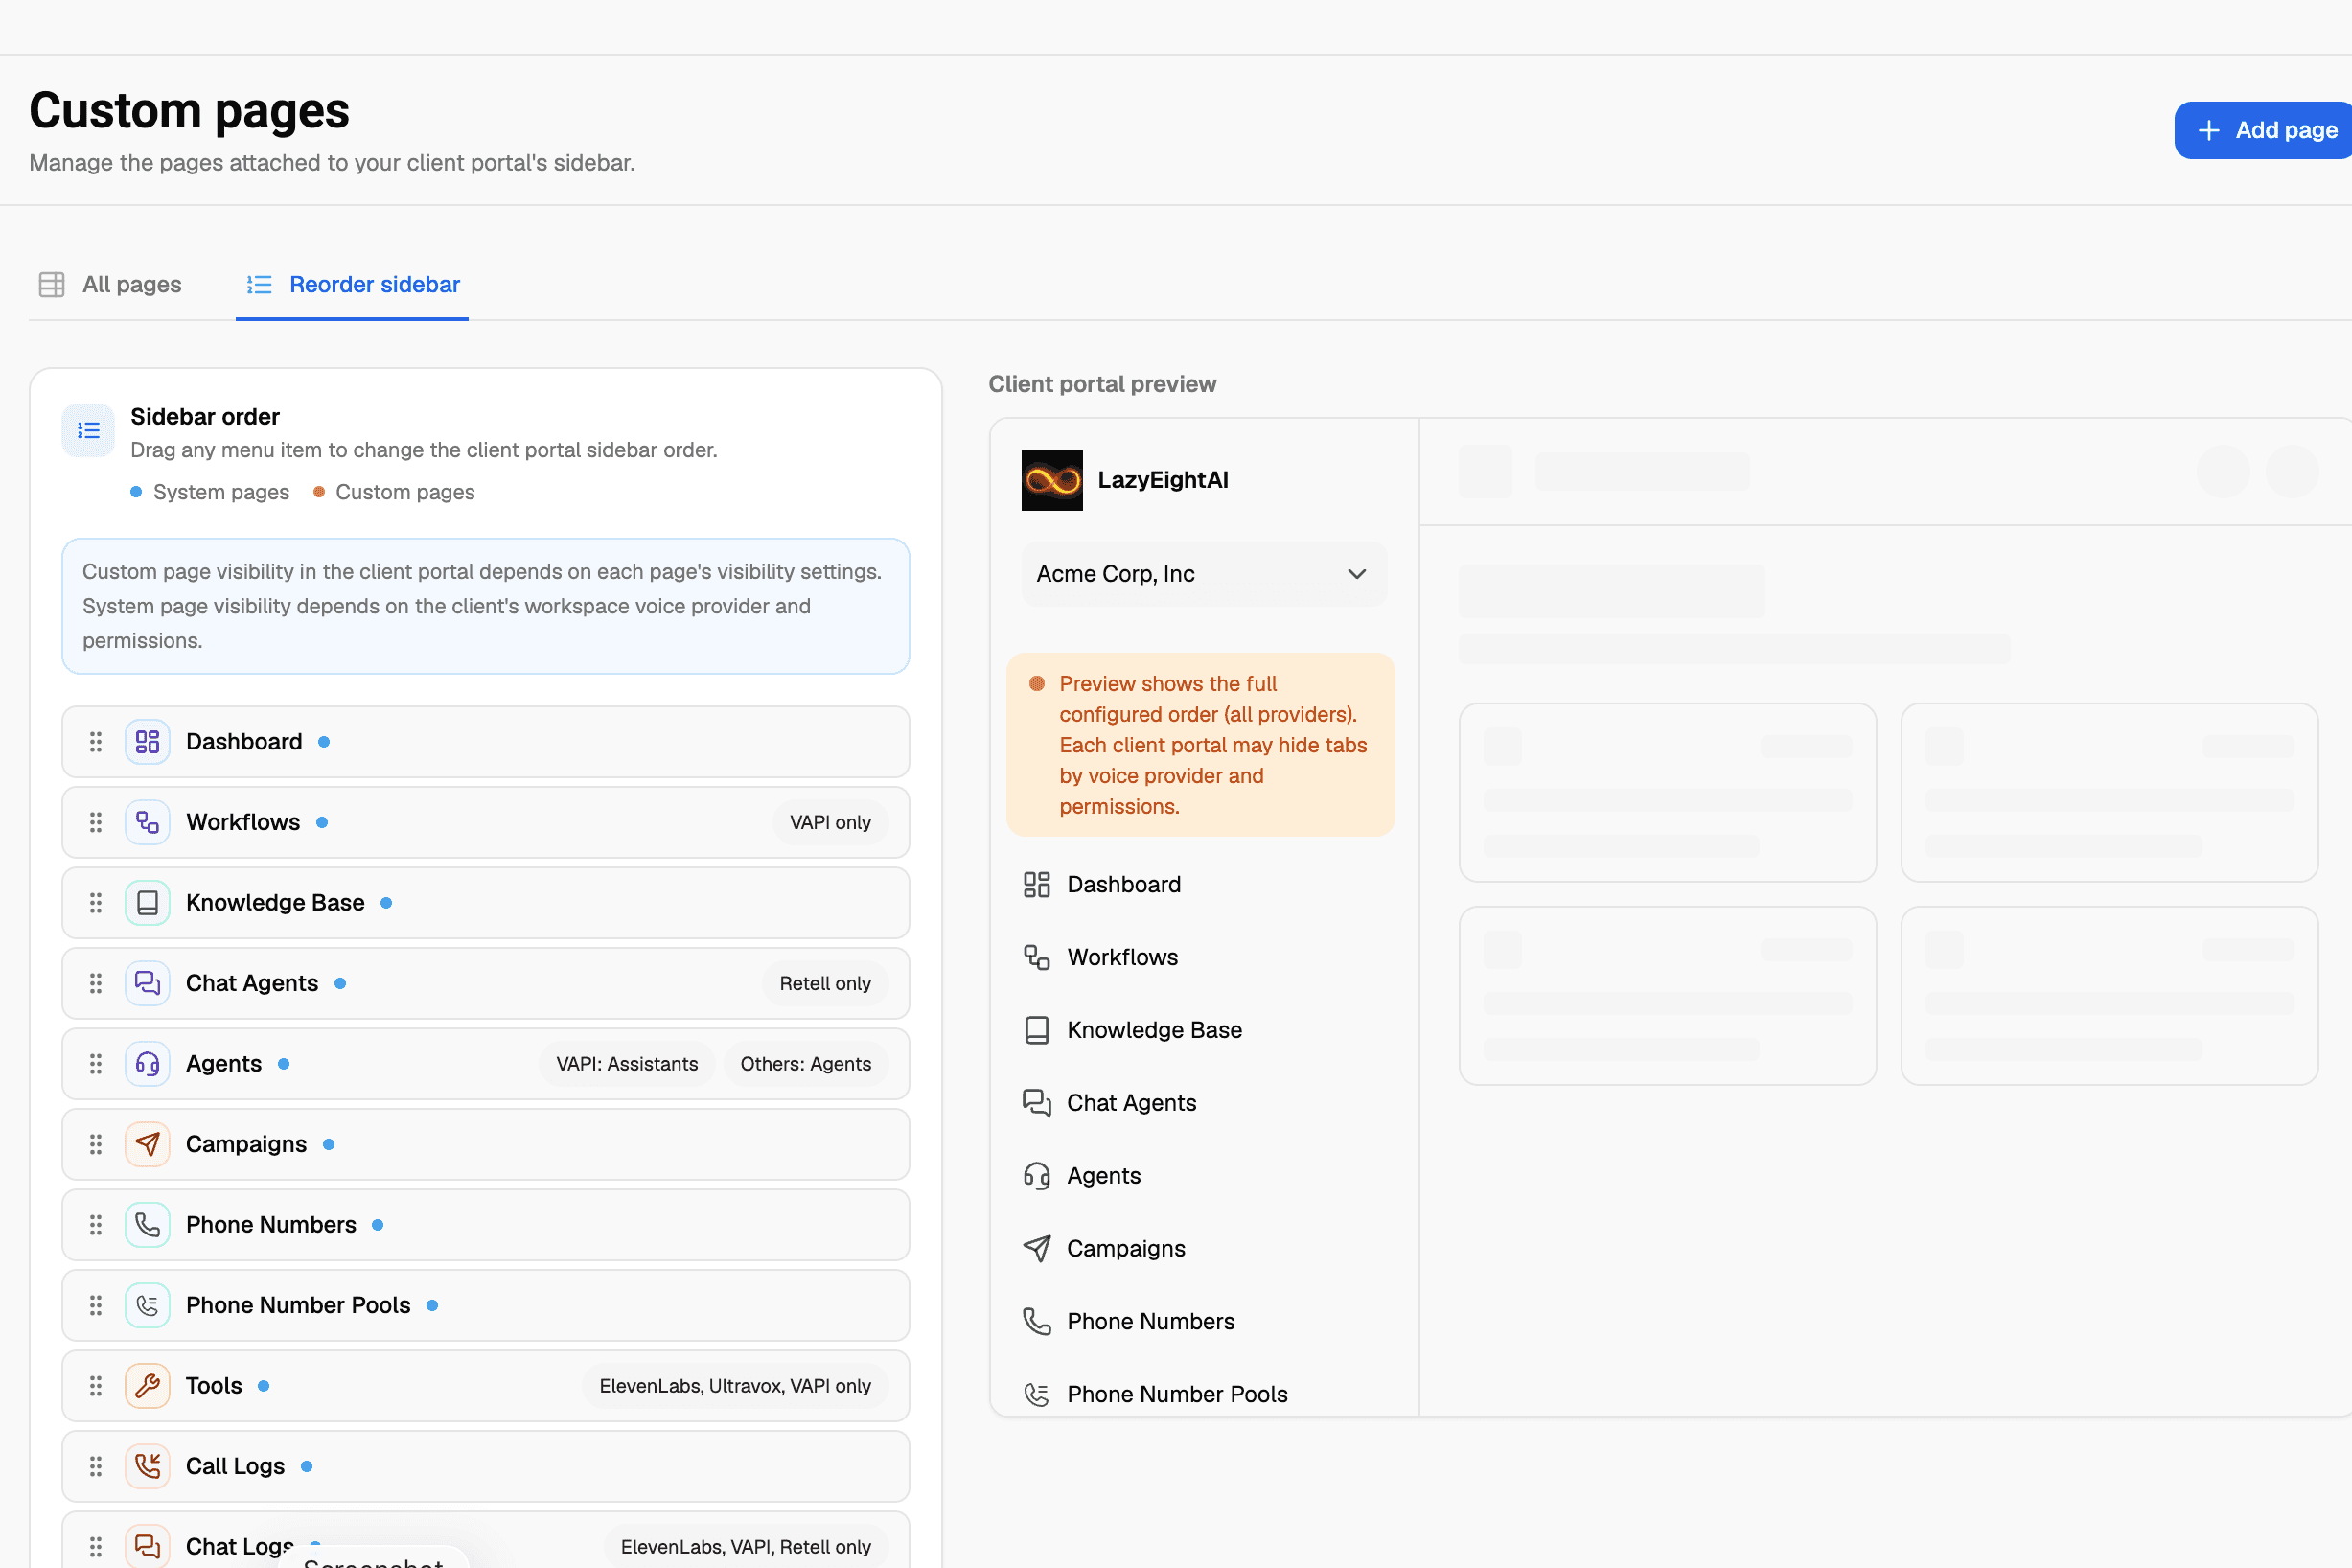
The portal is the part the client sees. Vapi and VoiceAIWrapper remain behind the agency experience when the domain, copy, branding, navigation, and support links are configured correctly.
Use the official white-label client portal setup guide for the DNS and preview sequence.
The current self-serve plans list multilingual portals. Custom pages, forms, and the support widget depend on the selected plan, so confirm those items on the current pricing page before including them in a client proposal.
Portal QA checklist
Open the portal through the agency domain, not an admin preview URL.
Confirm the browser title, favicon, logo, colors, support link, and sender identity.
Switch to every enabled language and review the navigation and custom pages.
Check the portal from a phone and a desktop browser.
Log in as a client and confirm that admin-only controls are hidden.
Step 7: Configure client rebilling
Open the billing settings and choose the billing method that matches your operation.
Stripe billing
Connect your Stripe account, then configure the current billing settings shown in VoiceAIWrapper. These can include the billing currency, usage price, tax treatment, billing plans, usage packs, and one-time charges.
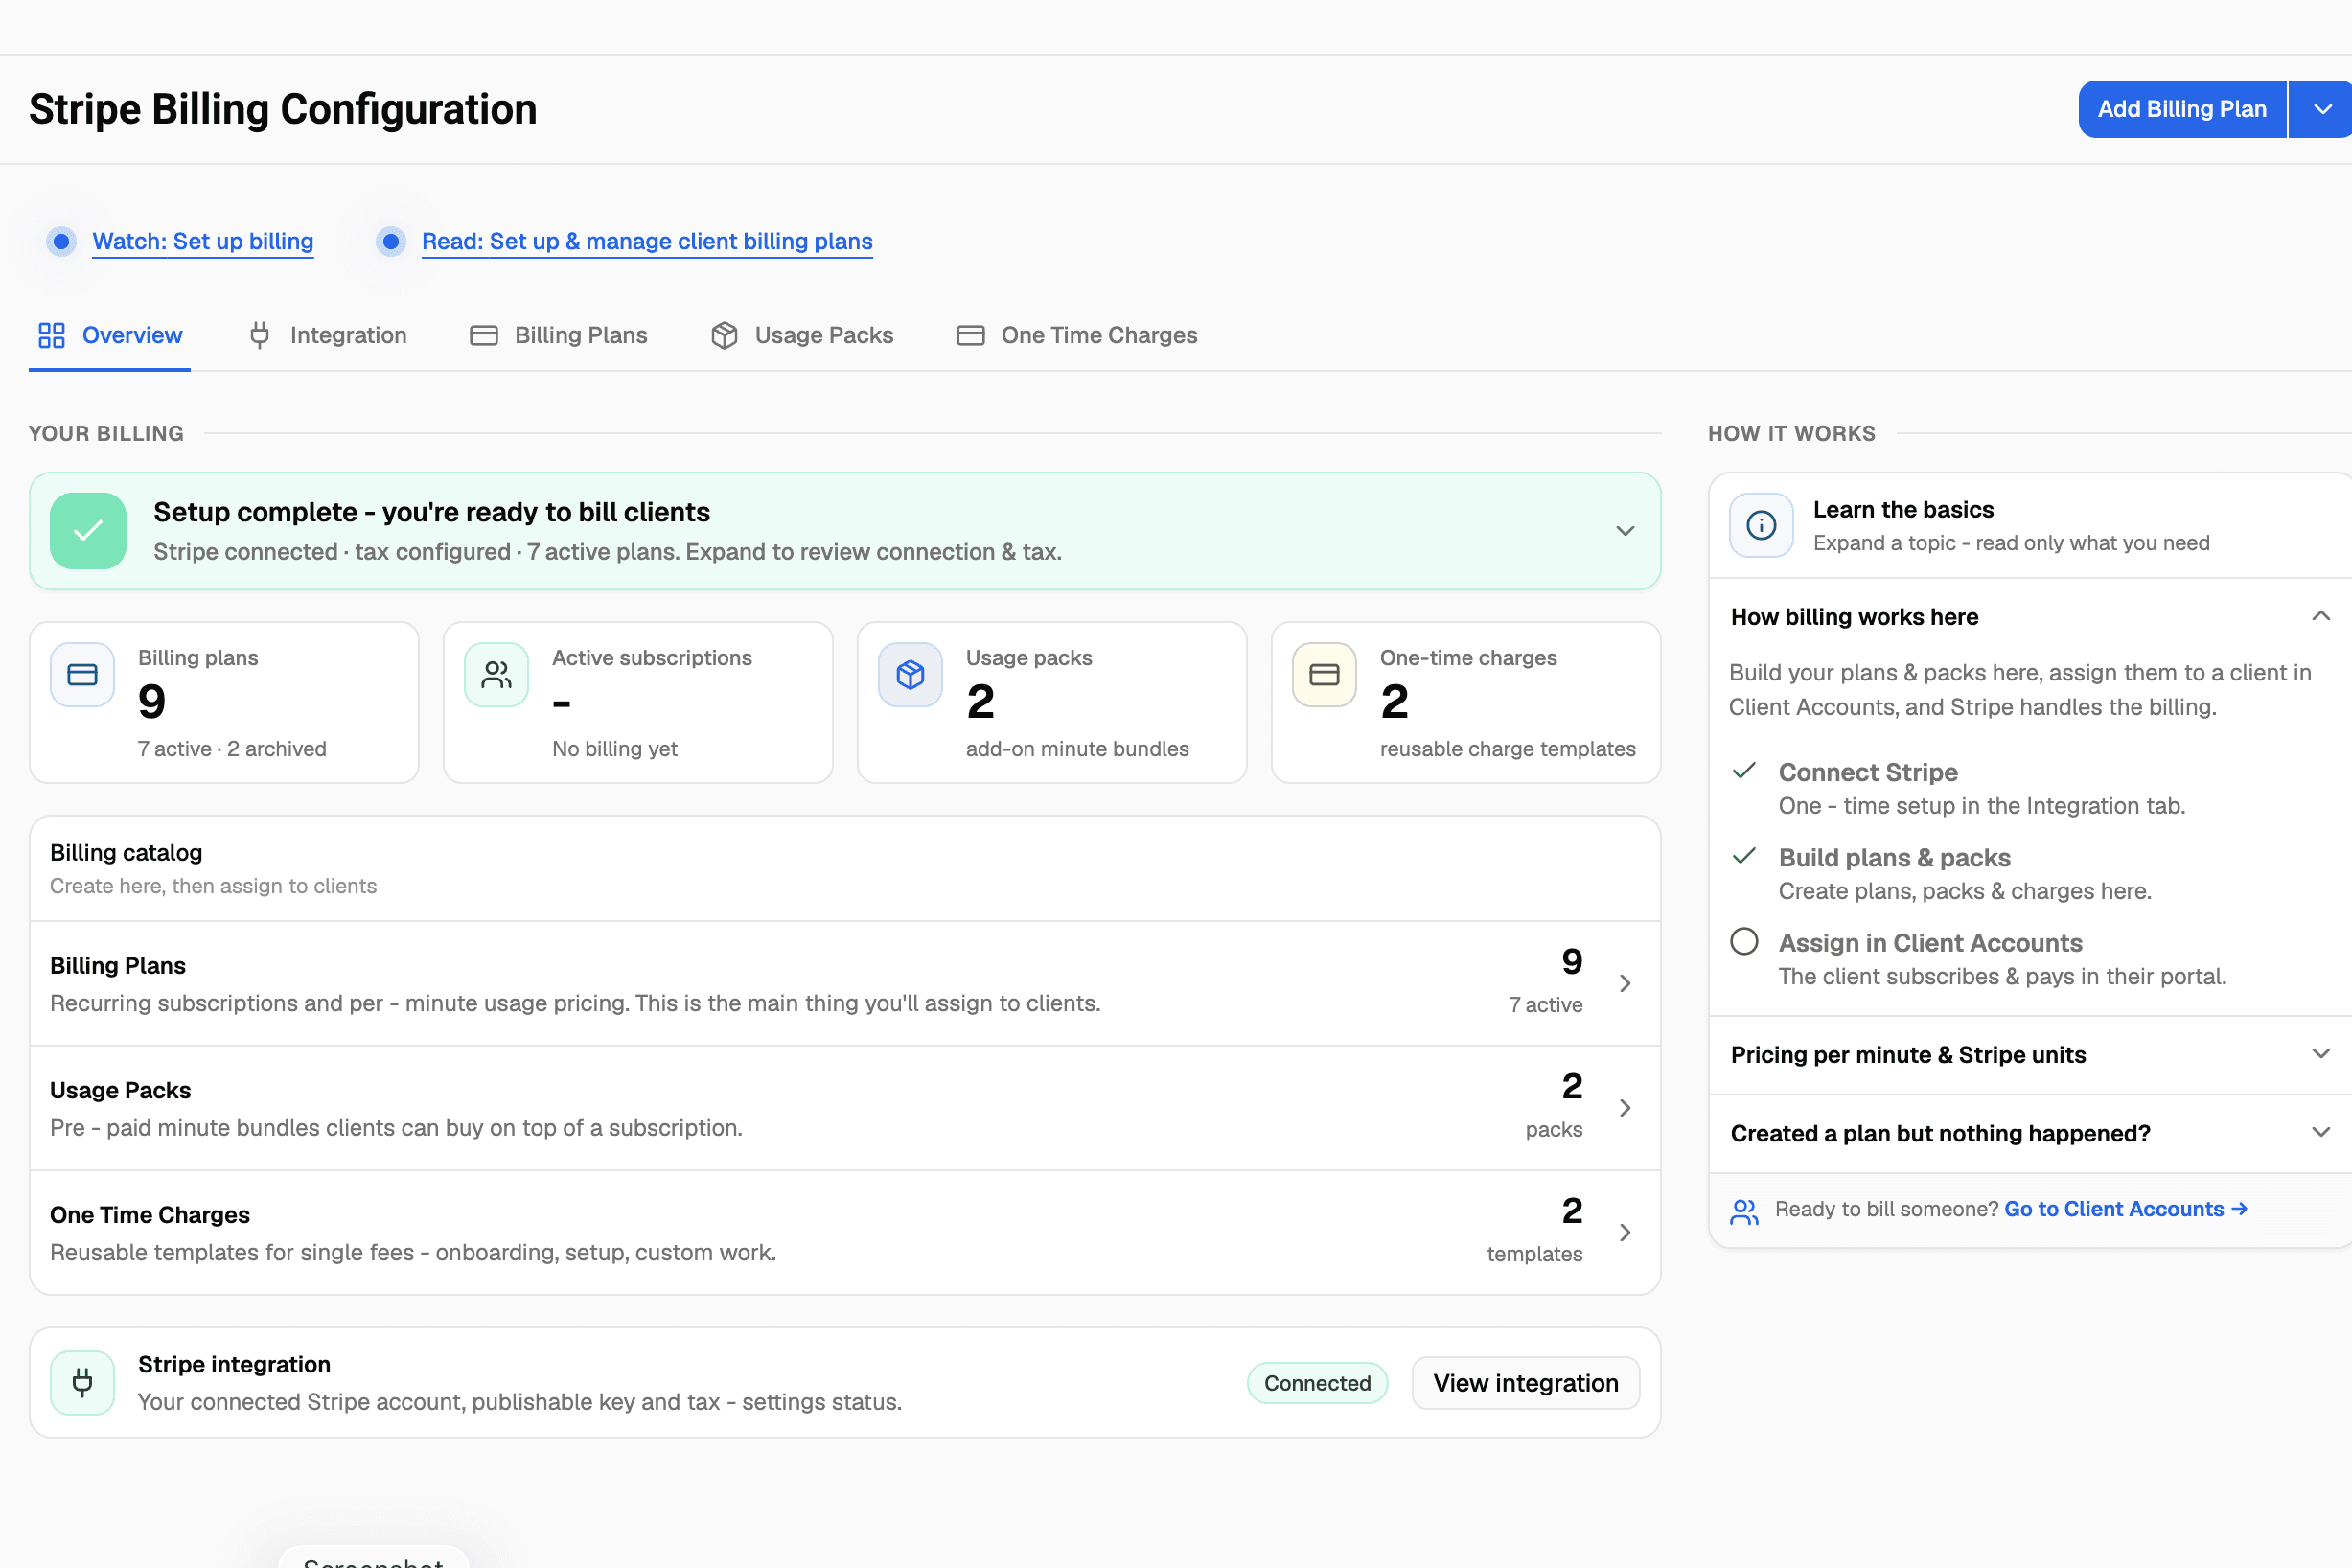
After creating a plan, assign it to the correct client. Creating the plan alone does not attach it to a workspace or collect a payment.
External billing
Use external billing when your agency collects payment outside VoiceAIWrapper and manages the client's billing status through its own operating process.
API-based billing
Use API-based billing when another billing system needs to connect programmatically. Current plan availability places this method on Pro. Confirm the required API access and implementation scope before promising support for a specific payment processor.
Do not describe the full client charge as profit. A useful pricing calculation is:
client revenue - Vapi usage - VoiceAIWrapper cost - payment fees - support and operating costs = gross contribution
Current billing reference: Set up and manage client billing plans. Check current pricing and plan availability before promising a billing or portal feature to a client.
Step 8: Create the client account and workspace
Create the client account, then create a workspace for the client's service. Assign:
The correct Vapi Pod.
The approved agent or agents.
View and edit permissions for each asset type.
The correct billing plan or external billing state.
Assign campaigns to the client through the campaign's Assign to client control. Configure website widgets inside the relevant inbound phone or chat campaign. Do not treat campaign and widget access as part of the initial Pod-and-agent workspace assignment.
Keep permissions narrow at launch. A client who only needs to review activity and leads should not receive edit access to agent configuration, tools, or provider assets.
Follow the current client account and workspace guide for assignment and permission details.
Step 9: Test the client experience before launch
Use Login as User or the current client-preview control to inspect the workspace as the client. Do not rely only on the agency admin view.
Complete one end-to-end test:
Sign in through the agency-branded domain.
Confirm the correct workspace and permissions.
Place a test call or start a test chat through the intended client workflow.
Confirm that the interaction reaches the correct agent.
Check the call or chat record, usage amount, client-facing price, and billing state.
Confirm that a client cannot open another client's assets or admin controls.
Test the support path and sign-out flow.
This test catches a costly class of setup error: an agent can work correctly in Vapi while its client assignment, usage record, or billing rule is wrong in the agency layer.
Step 10: Publish the first client service
Once the core tests pass, publish the service the client bought. That may be an inbound phone agent, outbound campaign, website voice widget, chat widget, or a combined voice and chat widget.
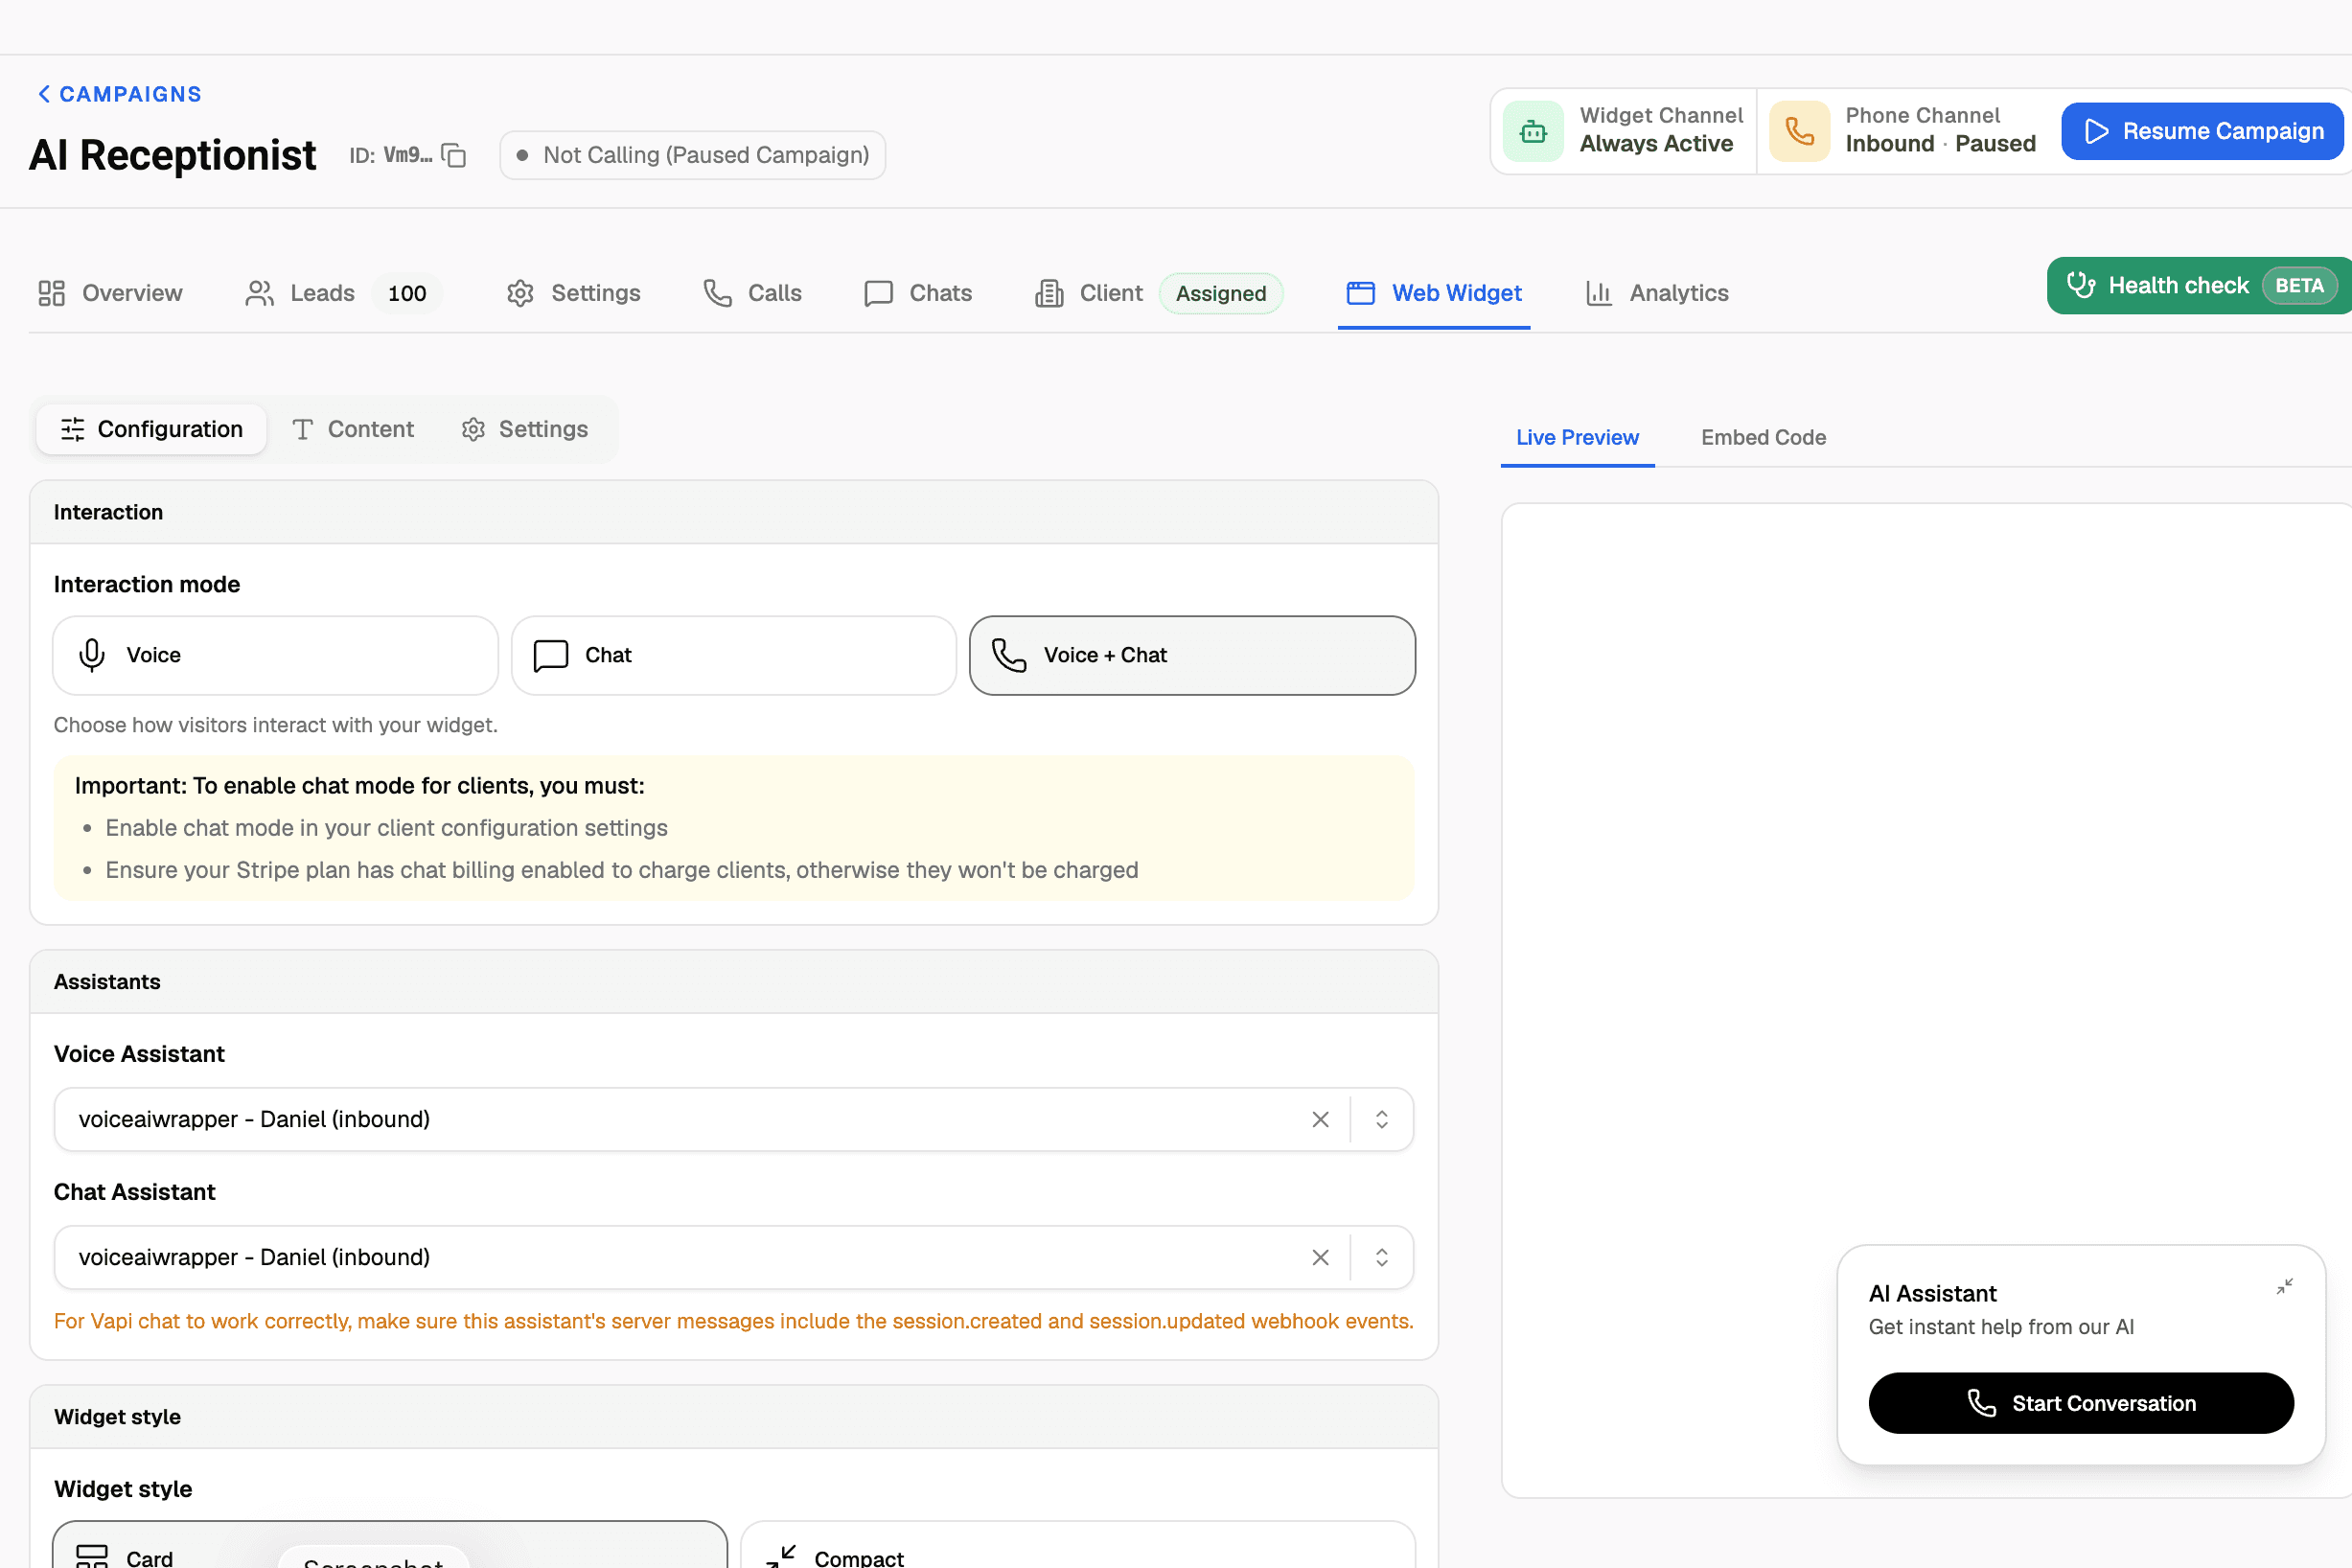
Start with a controlled volume. Review the first interactions manually, compare usage records with Vapi, and confirm that the client sees the expected activity in the portal. Increase volume only after the operating and billing records match.
For a Vapi chat widget, confirm that the required session.created and session.updated server events are enabled. Vapi's current server events reference defines both session events. Then run a fresh chat and check that the session and usage appear in the assigned client workspace. If you bill for chat, also confirm that chat billing is enabled on the client's plan.
The VoiceAIWrapper tutorials library covers additional implementation workflows. Browse Voice AI implementation insights for related technical guidance. For a product-level view of the Vapi offer, see the Vapi white-label platform for agencies.
Common Vapi white-label setup problems
Common Vapi white-label setup problems, likely causes, and checks
Problem | Likely cause | What to check |
|---|---|---|
Credentials are rejected | Wrong key, wrong organization, revoked key, or region mismatch | Recopy the current key, confirm the Vapi organization, and check the EU setting |
Assets do not appear | Pod did not finish connecting, wrong organization, or incomplete sync | Check Pod status before creating duplicate assets |
Calls fail during busy periods | Concurrency exceeds the provider allowance or is allocated to the wrong direction | Match the Vapi allowance and rebalance inbound versus outbound capacity |
Client sees the wrong agent | Wrong Pod, workspace, or asset assignment | Review the client workspace and remove unneeded assignments |
Client sees admin controls | Permissions are too broad | Test as the client and reduce view or edit access |
A plan exists but no payment is collected | The plan was not assigned, Stripe is not connected, or the client did not complete payment | Check connection, plan assignment, invoice state, and client payment status |
Usage appears in Vapi but not in the expected client record | The interaction ran outside the configured client campaign or logging path | Run a controlled call through the intended workflow and compare both logs |
Existing webhooks stop receiving events | The provider server URL changed without forwarding the previous destination | Review the current forwarding-webhook field and test the original integration |
Chat works but does not appear or bill correctly | Required Vapi session events or chat billing are disabled | Enable the required session events, confirm chat access for the client, and check the assigned billing plan |
Do not troubleshoot several variables at once. Change one setting, rerun the same test, and compare the Vapi and VoiceAIWrapper records.
What this setup does not remove
White-label software reduces the amount of product infrastructure an agency must build. It does not remove the agency's responsibility for:
Agent accuracy and safe failure behavior.
Consent, call-recording notices, outreach rules, and data handling.
Client offer design and pricing.
Payment disputes, refunds, taxes, and support.
Monitoring call quality and provider costs.
Protecting credentials and limiting client permissions.
If you only need Vapi for your own internal calls and do not need agency branding, client workspaces, or rebilling, using Vapi directly may be the simpler fit. If the client requires a fully custom proprietary application or unusual compliance controls, confirm the technical and contractual requirements before selling the project.
Verify trust and operating status before client launch
VoiceAIWrapper's published platform uptime commitment is 99.9%. The Better Stack capture taken September 4, 2026 showed the App operational. Check the live VoiceAIWrapper uptime page before each client launch because status changes over time.
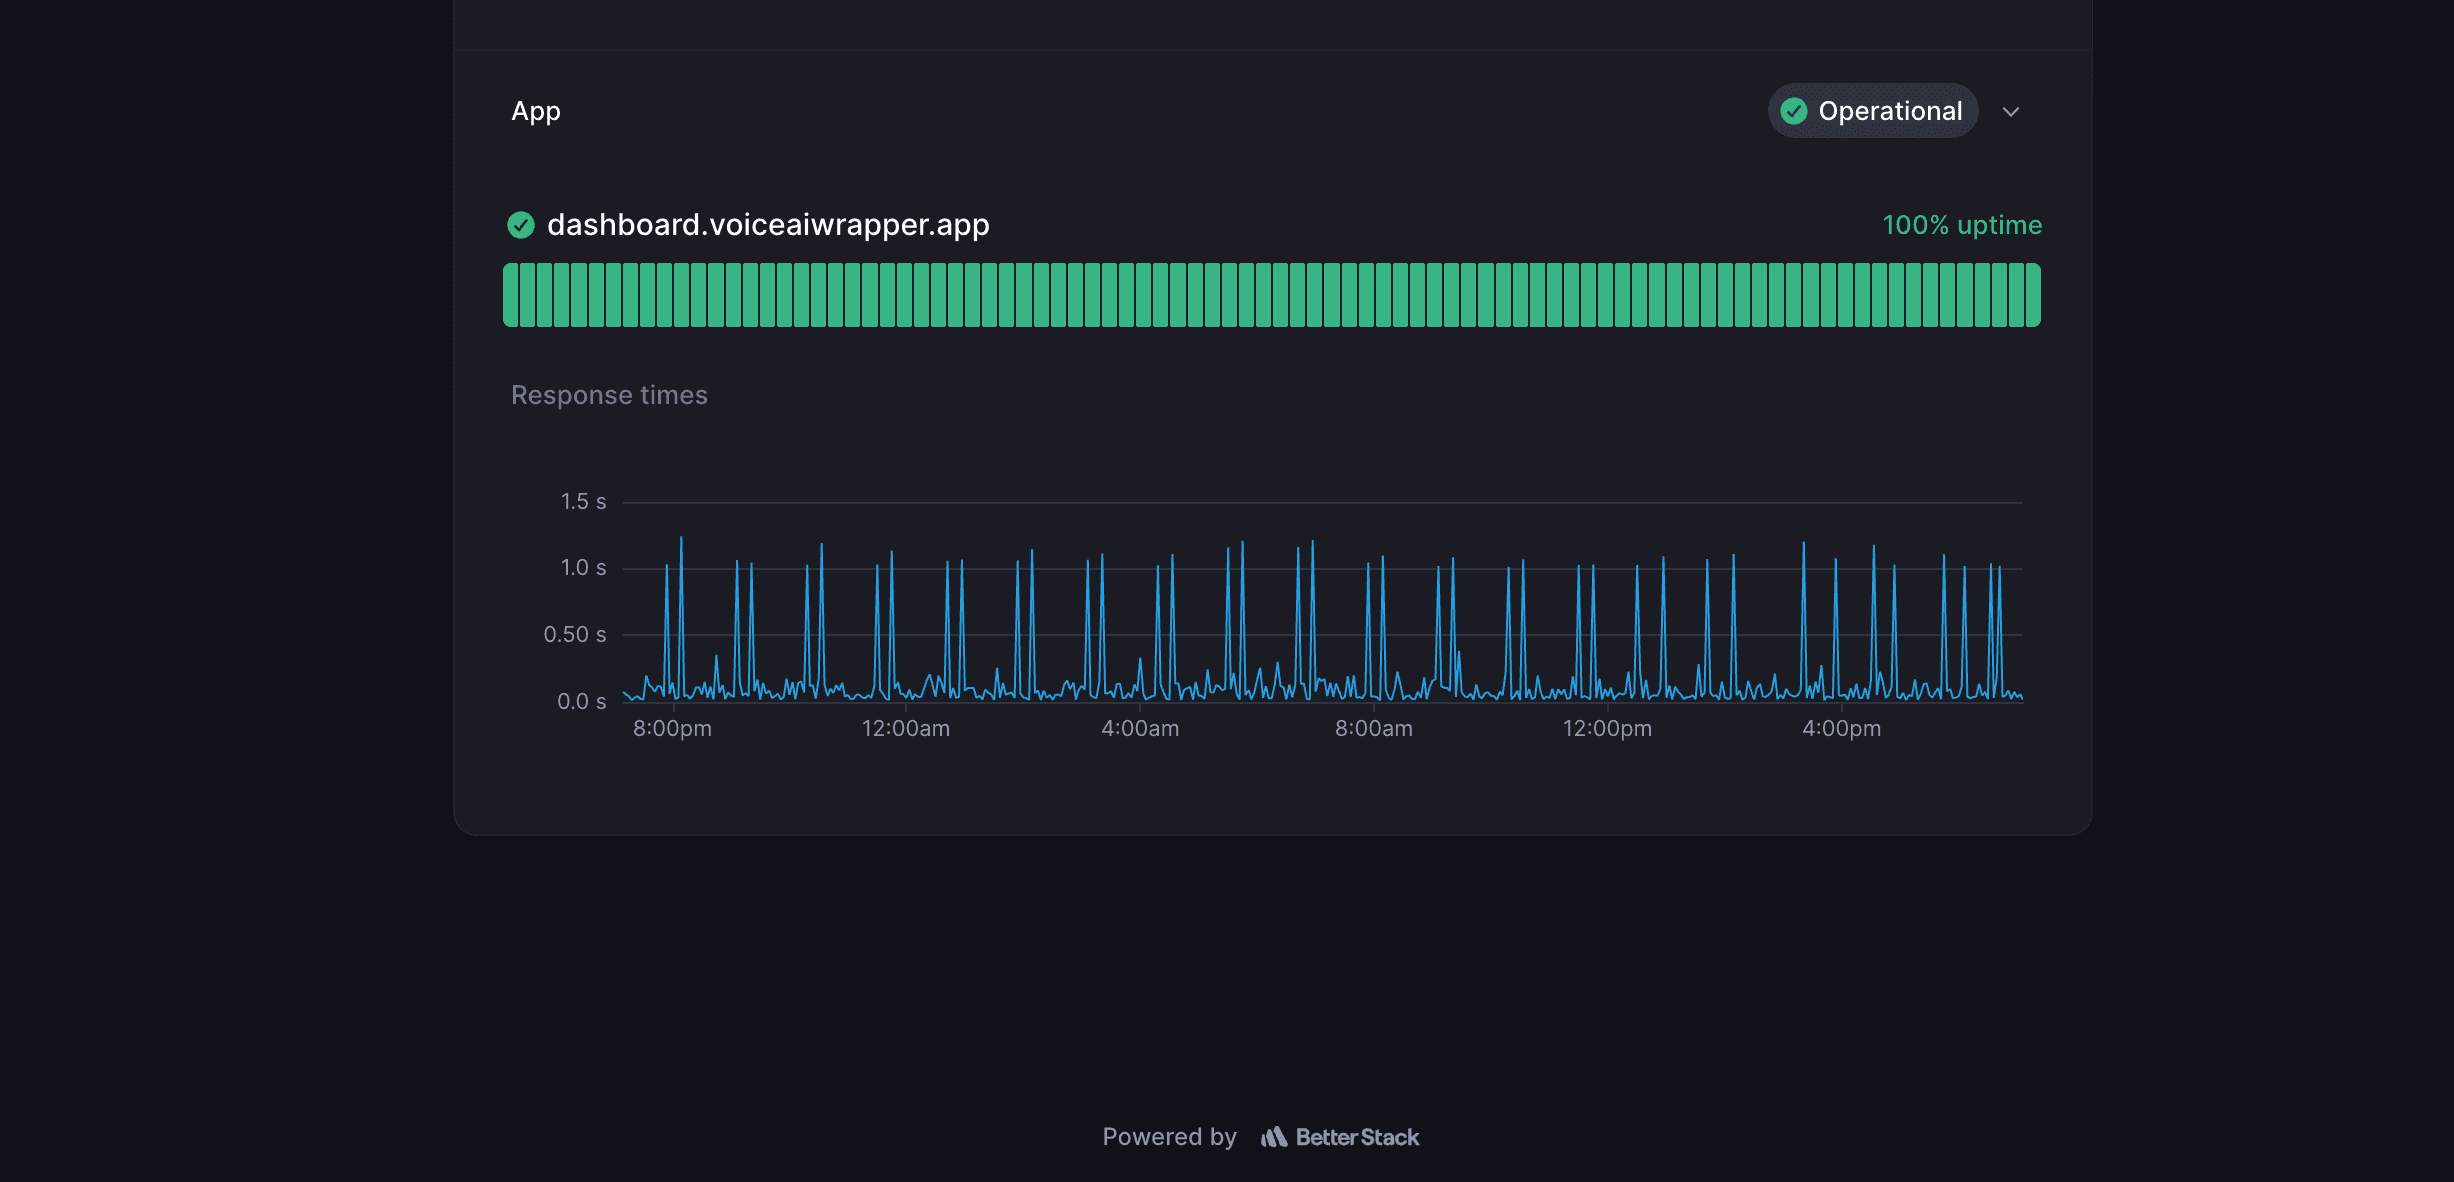
You can also review current customer feedback on G2 and SaaSHub. Review counts and ratings change, so verify the live profiles rather than copying a fixed total into client materials.
Vapi white-label setup checklist
☐ The correct Vapi organization, credentials, and region are connected.
☐ Concurrency matches the provider allowance and intended call direction.
☐ Required Vapi assets appear in VoiceAIWrapper.
☐ The production agent passed normal, edge-case, transfer, and failure tests.
☐ The agency domain, branding, pages, languages, and support settings are complete.
☐ The correct Pod, agents, assets, and permissions are assigned to the client.
☐ The billing method, client price, plan assignment, and payment state are correct.
☐ A client-view test passed on desktop and mobile.
☐ A test interaction appears in the correct logs and usage record.
☐ The first live interactions will be reviewed before volume increases.
Frequently asked questions
How do I white label Vapi?
Connect your Vapi organization to VoiceAIWrapper as a VoiceAI Pod, confirm the provider assets, create or select the client agent, configure your agency domain and branding, set client permissions and billing, then test the experience through a client login. Vapi runs underneath while the client uses your agency's portal.
What Vapi credentials do I need for VoiceAIWrapper?
Enter the Vapi API key and matching organization ID requested by the connection flow. Confirm that both values belong to the same Vapi organization. Also select the correct region and enter concurrency that matches the provider allowance. Store the API key as a server-side secret.
What syncs from Vapi into VoiceAIWrapper after I connect?
The connected account can expose provider assets such as assistants, workflows, squads, phone numbers, tools, and knowledge bases in VoiceAIWrapper. The exact asset types depend on the current provider connection and your Vapi organization. Confirm each required asset in the dashboard before assigning it to a client.
Can I create Vapi agents inside VoiceAIWrapper?
Yes. The current VoiceAIWrapper Agent Builder guides creation through Industry, Template, Business, Behavior, Tools, and Review stages. You can also work with connected Vapi assets. Test the final agent and confirm the expected result in both systems before making it available to a client.
Does VoiceAIWrapper charge for Vapi voice minutes?
No. VoiceAIWrapper adds no per-minute markup. Vapi bills the agency directly for provider usage, while the agency sets its own client-facing price in VoiceAIWrapper. Calculate margin after provider usage, the VoiceAIWrapper subscription, payment processing, support, taxes, and other operating costs. Check current pricing terms before quoting a client.
Can I bill clients through a payment processor other than Stripe?
VoiceAIWrapper has a direct Stripe billing workflow, a separate external billing option, and API-based billing. External billing means collecting payment outside the platform. API-based billing connects another billing system programmatically and currently requires Pro. Confirm current plan and API access before implementation.
Can I run Vapi and another voice provider side by side?
VoiceAIWrapper supports multiple provider Pods, subject to the current plan and supported-provider list. Keep each provider organization in a clearly named Pod and assign only the required Pod and agents to each client workspace. Test billing and permissions separately for every provider path.
What happens to my existing Vapi webhook integrations?
Adding VoiceAIWrapper can change the provider server URL used for event handling. Where the current setup provides a forwarding-webhook field, preserve the prior destination there and run a controlled test. Do not assume an existing CRM or automation still receives events until its full workflow has passed.
How long does the Vapi white-label setup take?
The connection itself is only one part of the work. Total time depends on DNS, agent readiness, billing, client permissions, and testing. A simple internal test can be configured quickly, but a paid-client launch should wait until branding, access, interaction logs, usage, and payment have all passed an end-to-end test.
Which plan do I need to bill clients with Stripe?
Choose a current plan that lists in-app Stripe rebilling. At the September 4, 2026 verification, the active self-serve plans included Stripe rebilling, while API-based billing was listed for Pro. Plan features can change, so check the current pricing page before quoting or onboarding a client.
Sources and verification
Connect and configure Voice AI Pods, VoiceAIWrapper Help, published July 2, 2026, accessed September 4, 2026.
Vapi API keys, Vapi, updated August 3, 2026, accessed September 4, 2026.
VoiceAIWrapper integration with Vapi, Vapi, repository updated August 3, 2026, accessed September 4, 2026. Used only for the current API-key and organization-ID connection fields and partner listing. Its older trial and setup-time claims were not used.
VoiceAIWrapper product screenshots supplied by Raj Baruah, captured September 4, 2026. These show the current Pod wizard, connected account, Agent Builder, portal editor, billing catalog, widget settings, and independent status view.
Configure your white-label client portal, VoiceAIWrapper Help, published July 2, 2026, accessed September 4, 2026.
VoiceAIWrapper pricing, accessed September 4, 2026. Used for current plan-level portal and billing availability, not fixed prices.
Set up and manage client billing plans, VoiceAIWrapper Help, published July 2, 2026, accessed September 4, 2026.
Set up client accounts and workspaces, VoiceAIWrapper Help, published July 2, 2026, accessed September 4, 2026.
Vapi server events, Vapi, updated September 3, 2026, accessed September 4, 2026.
VoiceAIWrapper uptime, accessed September 4, 2026.
Start with an internal test workspace
Create a controlled test account before onboarding a paying client. It is the fastest way to find wrong permissions, missing assets, branding gaps, and billing mistakes while they are still easy to fix.
Start a VoiceAIWrapper trial or review the platform features before you configure the first Vapi Pod.
About the author: Raj Baruah is the founder of VoiceAIWrapper. He has more than 12 years of B2B SaaS experience, including roles at Adobe and TalkPush, and builds white-label voice AI infrastructure for agencies. Read more on the VoiceAIWrapper About page.
Like this article? Share it.